Networking
Starting point
- In order to connect any device to the network, the following steps must be completed:
- Installing a network card (usually integrated on the motherboard)
- Drivers for the network card → device recognised in the system
- The computer is connected to the network
- with network cable or
- wirelessly (e.g. Wi-Fi or 4G/5G)
- Configuring network adapter settings
- Configuring IP settings manually
- Obtaining IP settings from the network from the DHCP service (enabled by default)
- The computer has been successfully added to the network
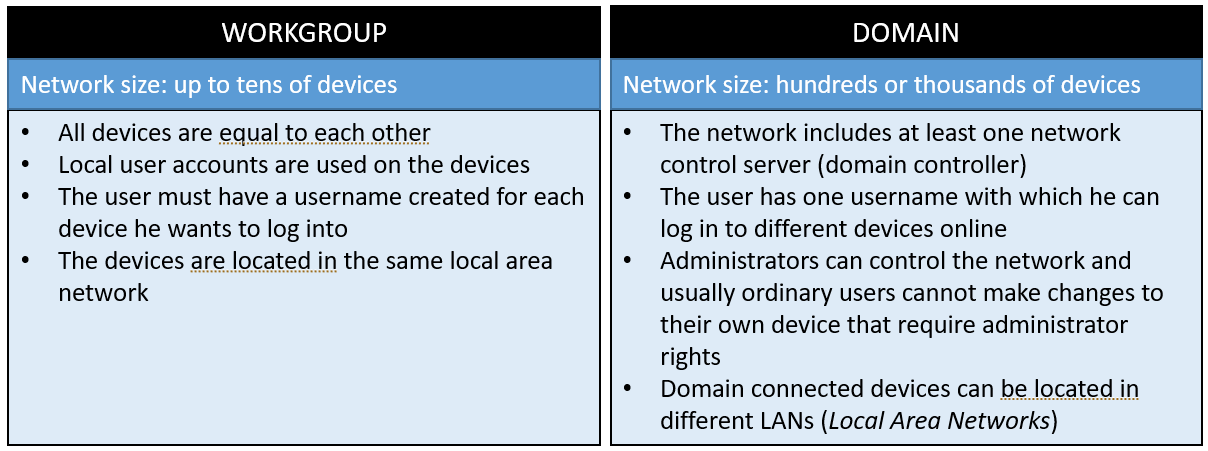
Workgroup vs domain
- User's device can belong to either a workgroup or a domain
- Which device belongs to often depends on the size of the network and thus the implementation
- Smaller networks → Workgroup
- larger networks → domain
Network settings in Windows 11
- Network settings can be found under the Network & Internet panel in Settings app
- The structure of the panel is presented in the image below
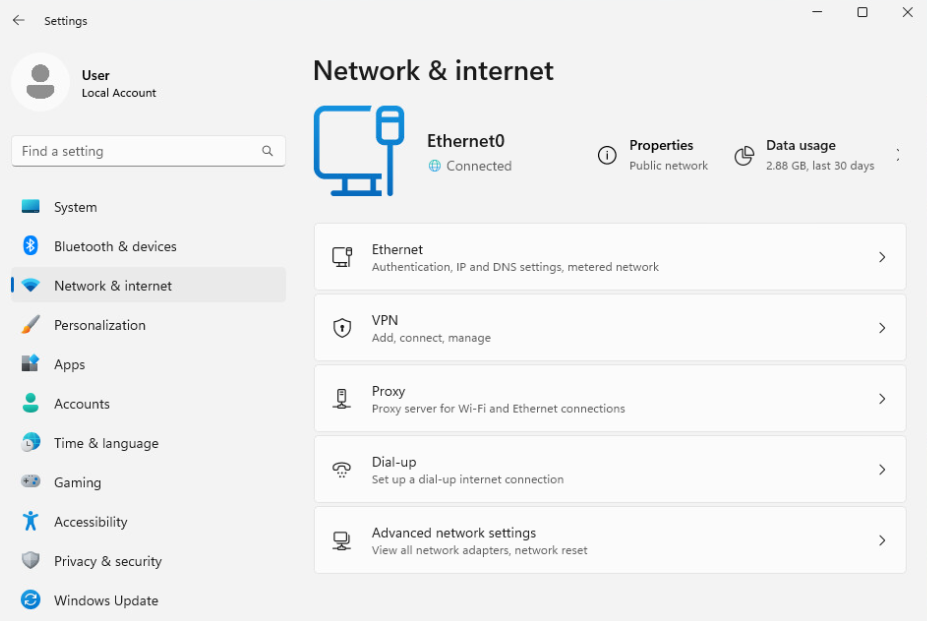
- There are five submenus available in the main view of the Network & internet panel:
- Ethernet: This menu allows you to manage your Ethernet connection settings. You can view the status of your Ethernet connection, change adapter settings, and configure properties like IP address assignment and DNS settings.
- VPN: In this menu, you can manage Virtual Private Network (VPN) connections. You can add, edit, or remove VPN profiles, configure VPN settings such as server address and authentication methods, and connect or disconnect from VPN networks.
- Proxy: This menu is for configuring proxy settings for your network connection. You can specify manual proxy settings, including proxy server address and port, as well as configure automatic proxy setup using a PAC (Proxy Auto-Configuration) file or a script.
- Dial-up: If you have a dial-up connection configured on your system, this menu allows you to manage dial-up networking settings. You can view and configure dial-up connections, including modem settings and connection properties.
- Advanced network settings: This menu provides access to advanced network settings and troubleshooting options. You can configure options such as IP settings, network discovery, network reset, and network troubleshooter to diagnose and resolve network-related issues.
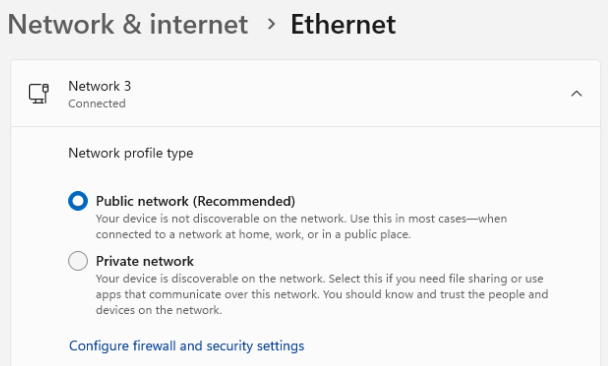
Network profile types
- When connecting a computer to a new network, the network is set to Public profile type by default
- Windows defines security and other settings based on network profile type
- Choosing a proper network profile type:
- Private [Private] (network search enabled → you can see network devices and users)
- Public [Public] (network search and resource sharing disabled → network users cannot see each other)
- Network profile type can be selected under the Ethernet menu (see the image below)
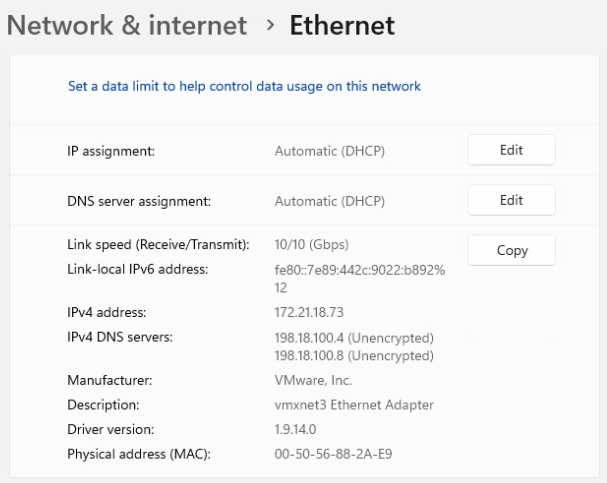
Network connection information
- The network connection has the following information:
- IP address
- MAC address (physical address of the network interface)
- The default gateway
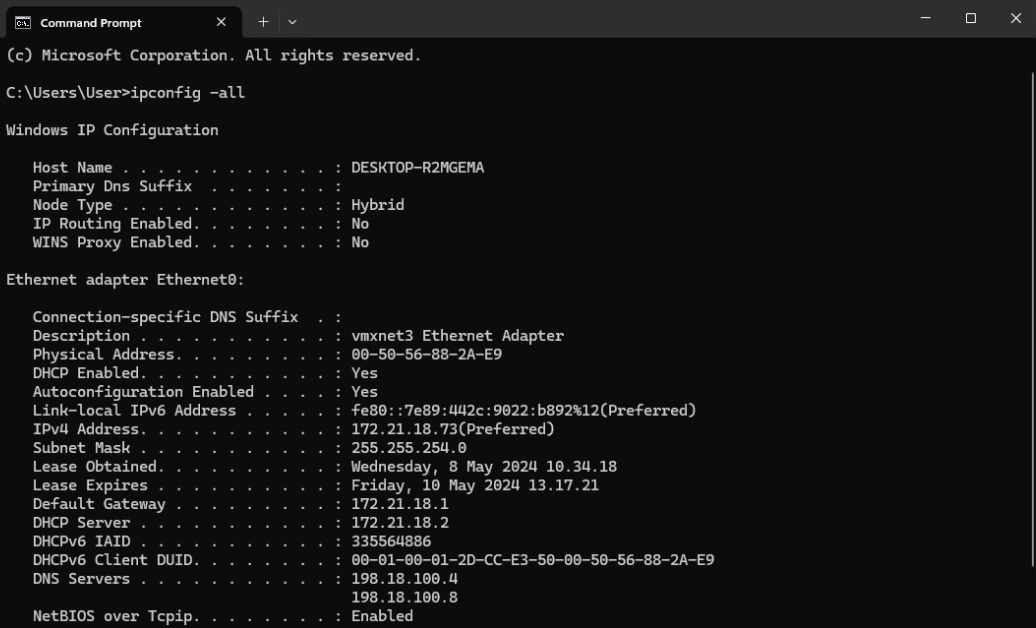
- This information is searchable through both the graphical user interface (GUI) and the command prompt (CMD)
- Below is an example of of network connection information shown under the ethernet connection settings
- Through the command prompt, the information can be retrieved using the ipconfig -all command
Changing IP address information
- By default, Windows automatically obtains an IP address from the DHCP service
- If the address needs to be set manually (for example, to a server that must always be reachable from the same IP address), the address information can be changed as shown below
- When setting the IP address manually, it is necessary to know whether the machine is being connected to a network environment according to the IPv4 or IPv6 protocol
- In the example below, IPv4 protocol is used
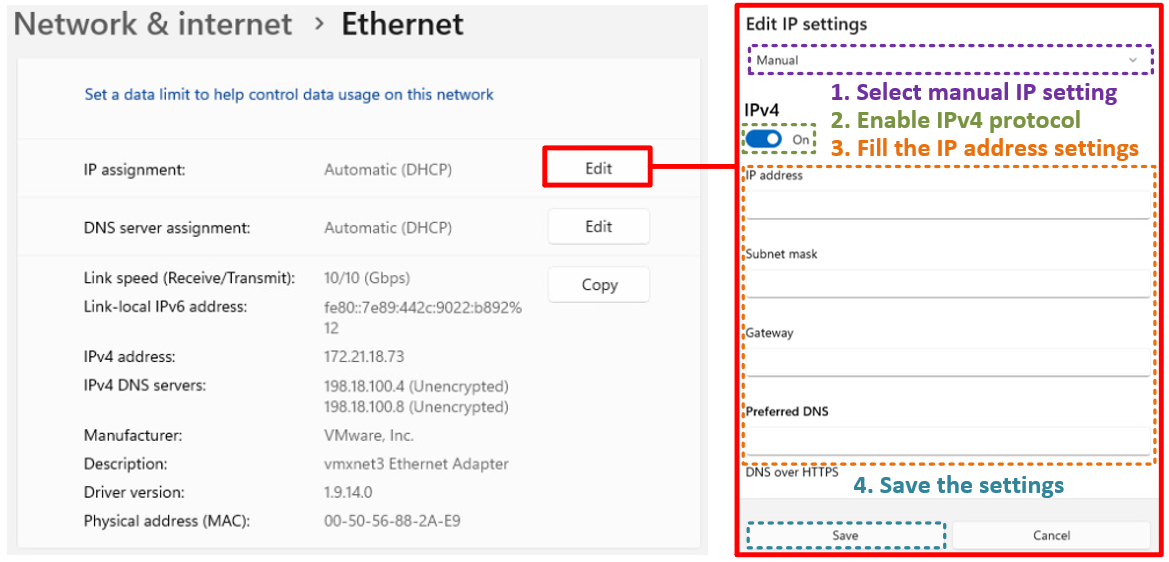
Note: Do not change the address information for your deployed virtual machine in VLE environment as it will become unreachable with incorrect IP settings!
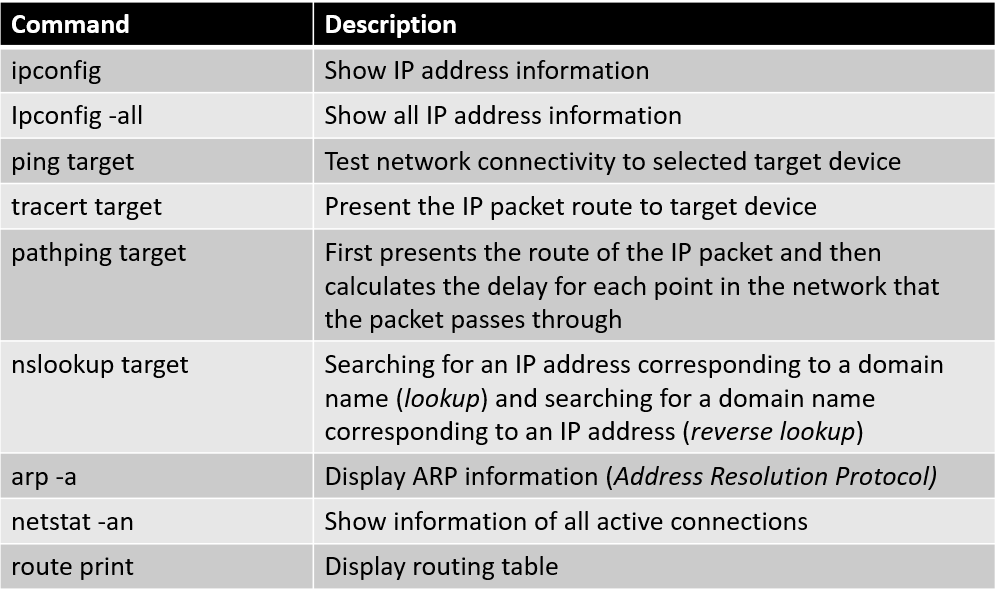
Network commands in Command prompt (CMD)
- Command Prompt has many useful network-related commands, some of which are listed below
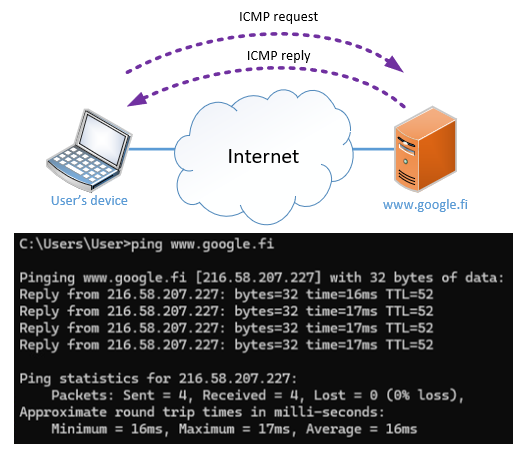
Below are some examples of the ping and tracert (traceroute) network commands
- We measure the response time in milliseconds (ms) when the packet is sent to the destination and the return message is received
- This measurement is repeated four times by default
- Continuous ping can be used with -t parameter (ping -t www.google.fi) and interrupted with Ctrl + C key combination
Example 1: Ping the address www.google.fi
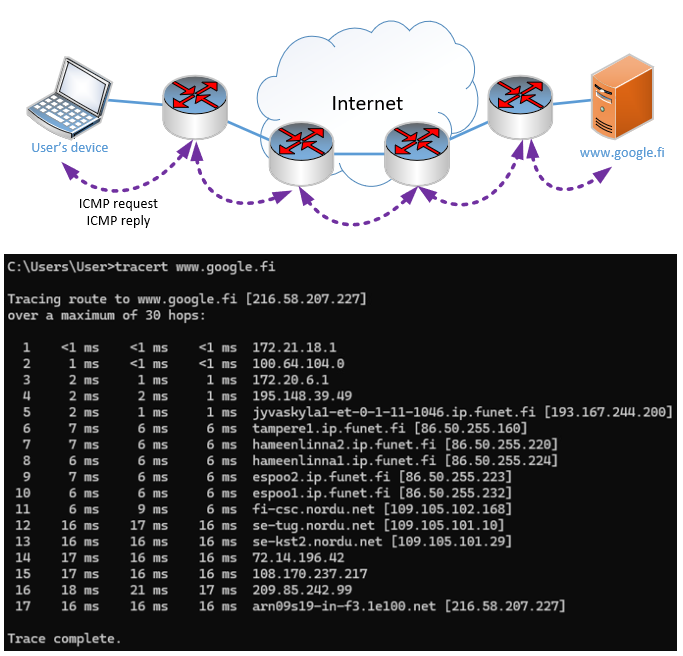
- The measurement is performed for each point three times, and thus response times and the route are printed on the screen
Example 2: Traceroute to the address www.google.fi
Wireless networks
- Previously in this theme the Ethernet was presented as a wired physical media for connecting a client to the network
- However, in many situations nowadays users connect to network using wireless networks when using a laptop for example
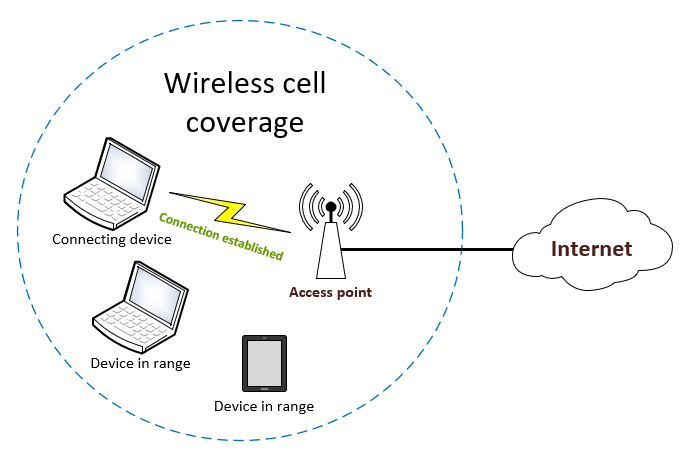
- Below is an example image presenting the idea of wireless network
- Access point provides a coverage cell from which devices can connect to the wireless network
- Access point is connected to wired network and connected devices also use this connection for internet access and other services
- When device has the wireless chip enabled, wireless networks in range are listed under the taskbar menu as shown in the example image below
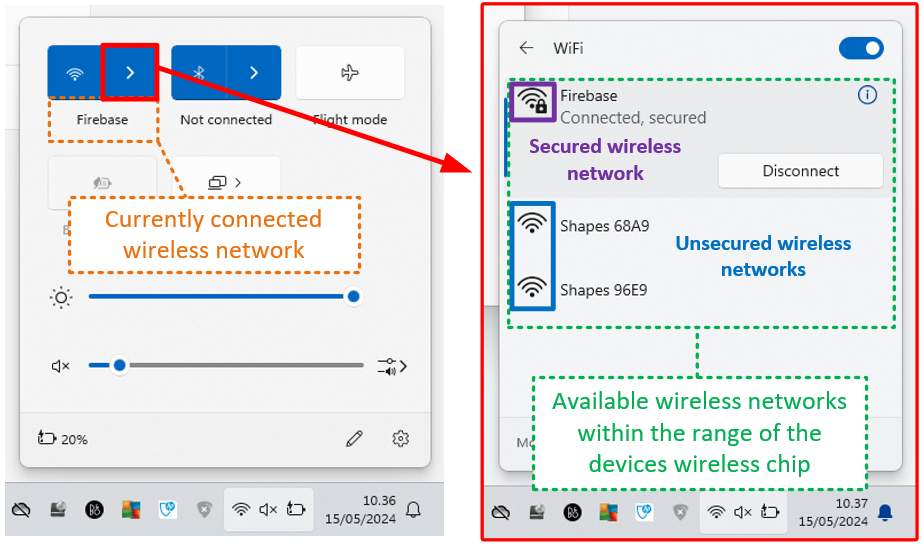
- As can be seen from the example image, wireless networks can be listed as either secured or unsecured
- Secured wireless network requires the password in order for the device to join
- It is important to notice that even unsecured wireless networks can have authentication service implemented and joining device can be asked for a valid user account in login
- Each wireless network can be saved with unique settings for each network
- After connecting successfully to a selected wireless network its settings can be accessed
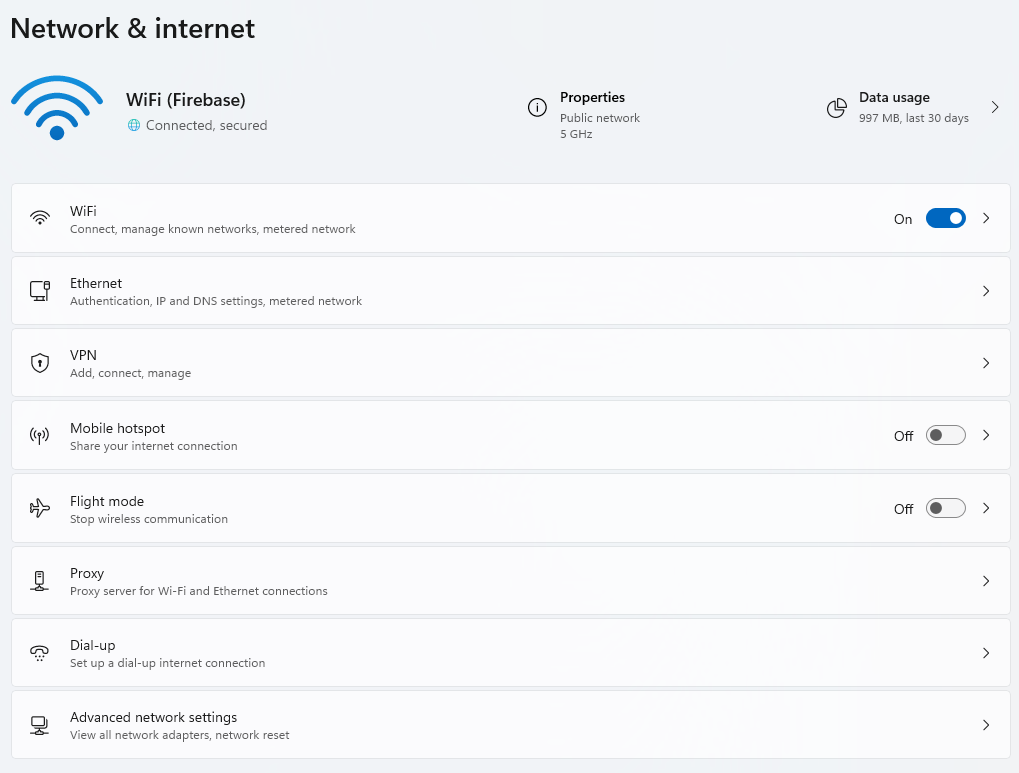
- Networking menu will have some new submenus available when WiFi is enabled in the device
-
As can be seen from the example image, new available setting menus for devices with wireless radio are the following
- WiFi: All wireless settings for the device
- Mobile hotspot: Enable sharing of your internet connection with other nearby wireless devices either with WiFi or Bluetooth
- Flight mode: Enable or disable all wireless radios programmatically
-
Settings under the WiFi menu are shown below with descriptions

Remote Desktop Connection (RDC)
- Makes it possible to establish a connection to a host computer on the network from a client computer (e.g. from a home computer to a workplace computer)
- The data of peripheral devices (mouse movement and keyboard presses) is transferred over the network
- Remote Desktop Connection client is available in all versions of Windows 11
Note: An RDC connection cannot be established to the device with the Windows 11 Home version installed (the Home version does not include the RDC Server service)!
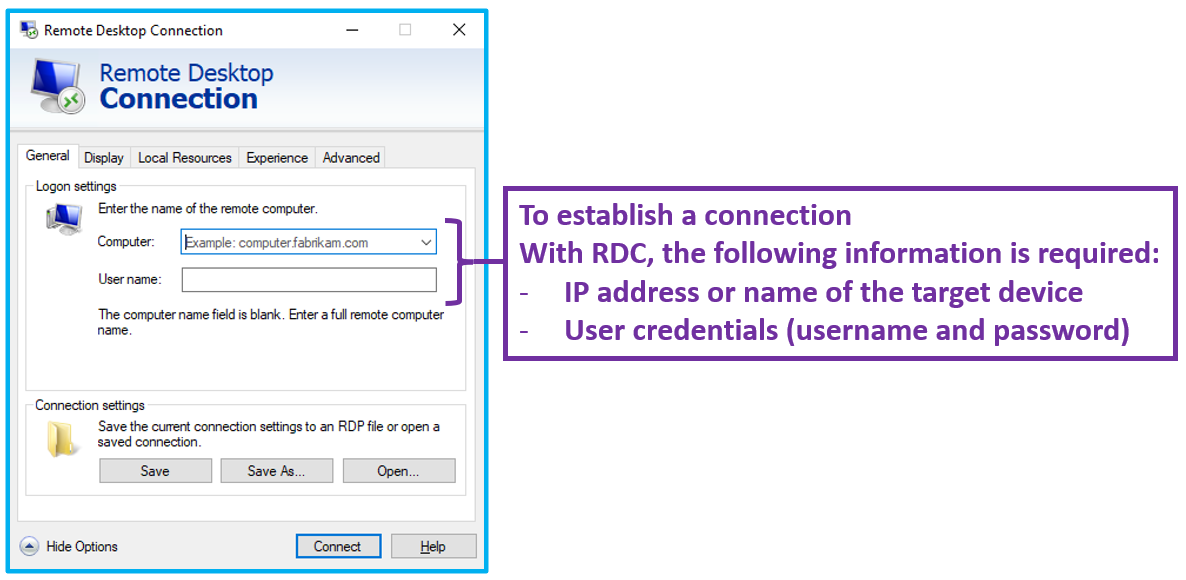
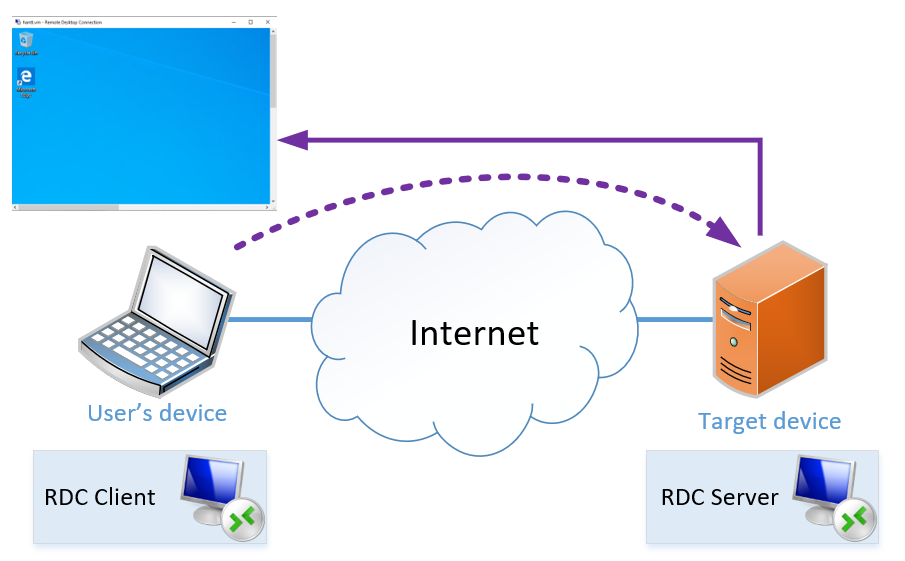
- The idea of the RDC connection is described in the image below
Network drives
- In Windows, it is possible to add a disk on the network as part of the system, so that the contents of the network drive can be viewed on the local machine
- The network drive is given a drive ID (e.g. Z:) and a network path
- The drive can be set to automatically map to the system when Windows starts
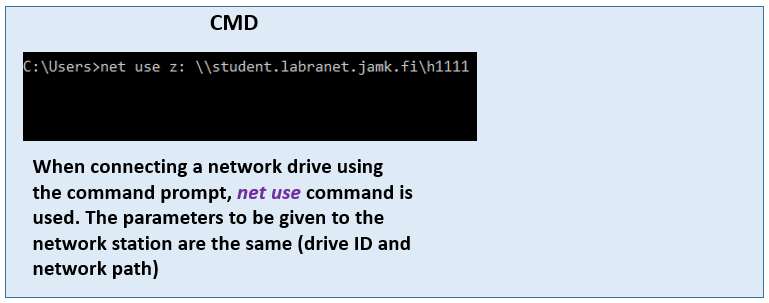
- Example images are shown below presenting how network drive can be mapped from Windows GUI and Command prompt (CMD)
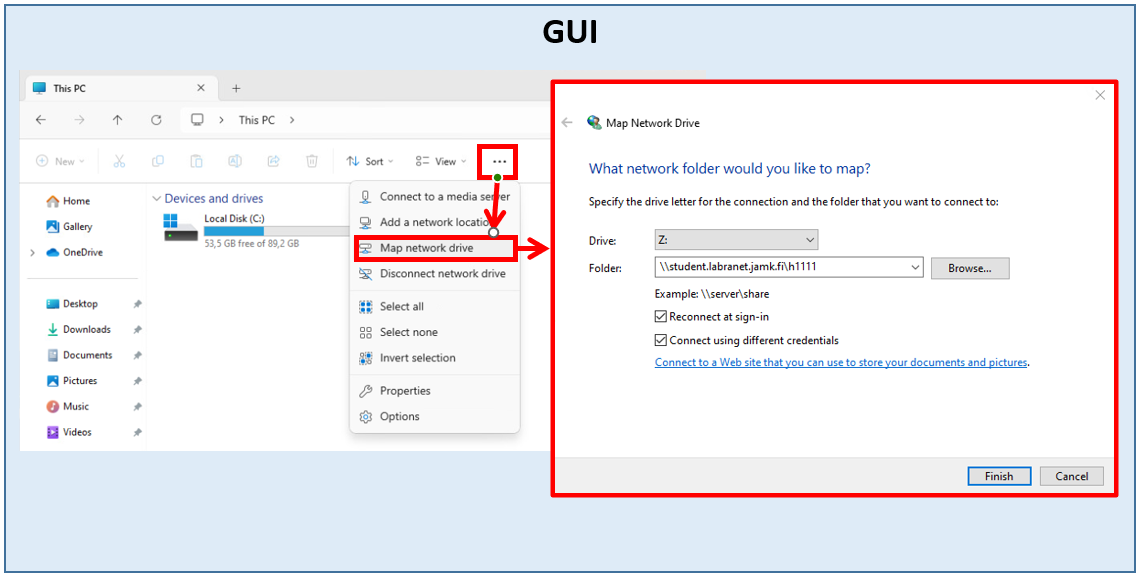
Note: By default, an attempt is made to connect to the network drive using the machine's local credentials. However, this is often not the right way, and the credentials must be changed to match the credentials required by the target system!
Sharing files and folders
- Before sharing files and folders in Windows, sharing must be enabled under the Advanced network settings panel
- This panel can be accessed like shown in the image below
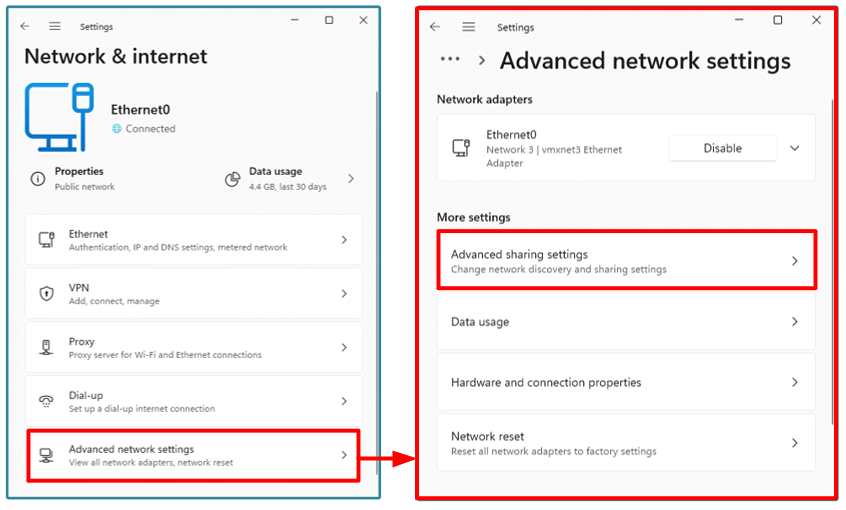
- From this panel users can edit sharing settings related to network type they use
- Settings are available for the following:
- Private networks
- Public networks
- All networks (sharing settings will also apply to other two network types)
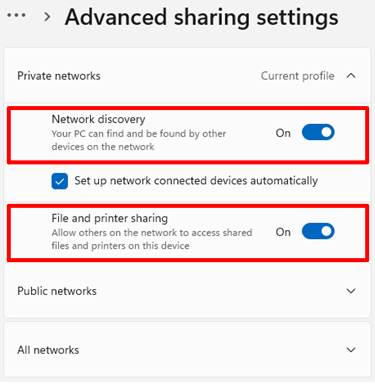
- As can be seen from the example image below, both Network Discovery and File and printer sharing are enabled for the Private network network type
- Network Discovery: Other devices connected to the same network can found this PC
- File and printer sharing: Other devices can access shared folders and files in this PC (files and folders will be shared separately later)
- Now that all necessary settings are enabled, files and folders can be shared from the system
- Below is an example where sharing is enabled for the folder C:\sharing
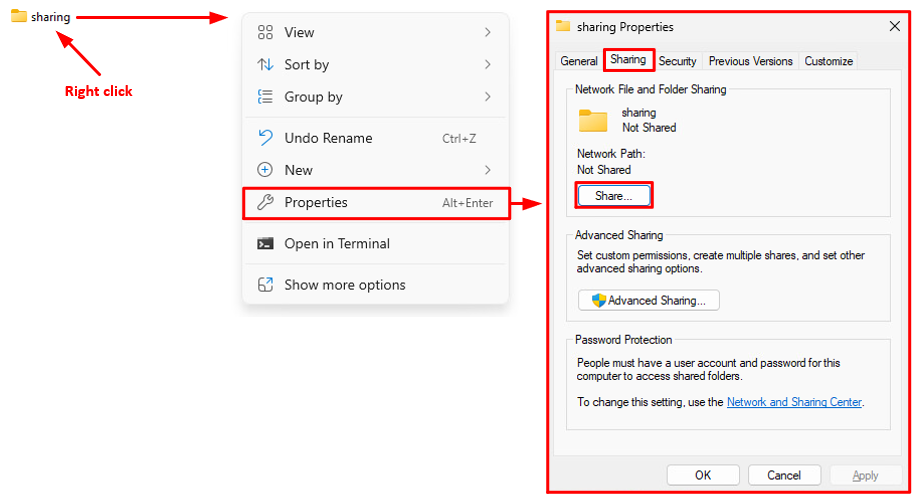
- Sharing permissions are set here and later the required file system permissions (NTFS permissions) are reviewed
Note: sharing permissions can only be set for directories, not for individual files!
- After clicking the Share... button, the Network access window is shown
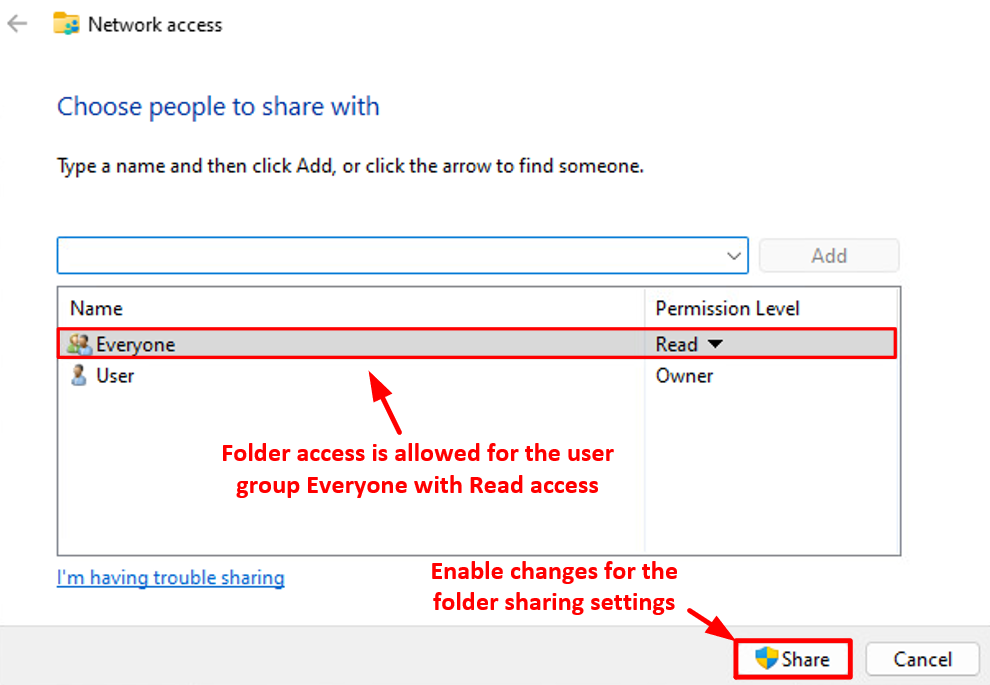
- As can be seen from the example image above, C:\sharing folder access has been modified so that every user with Everyone user group membership has the read permission
- Read permission allows users to list the contents of the folder and read the files inside the folder (creating new or modifying existing files or folders is not allowed)
- Folders have Advanced Sharing settings with more features (see example image below)
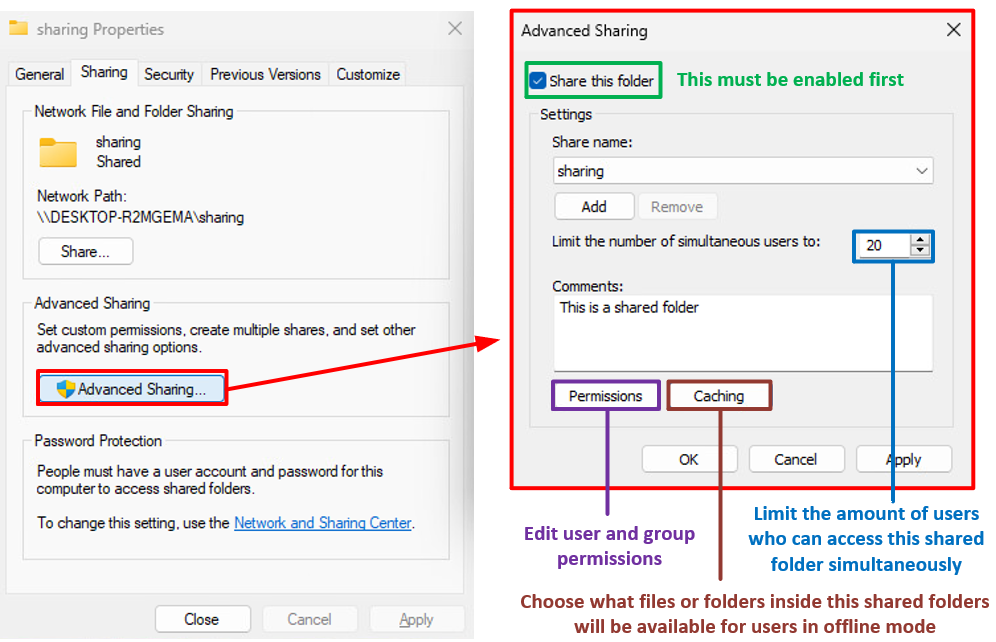
- By pressing the Permissions button access for more users or groups can be added
- Folder permission settings are presented in the example image below
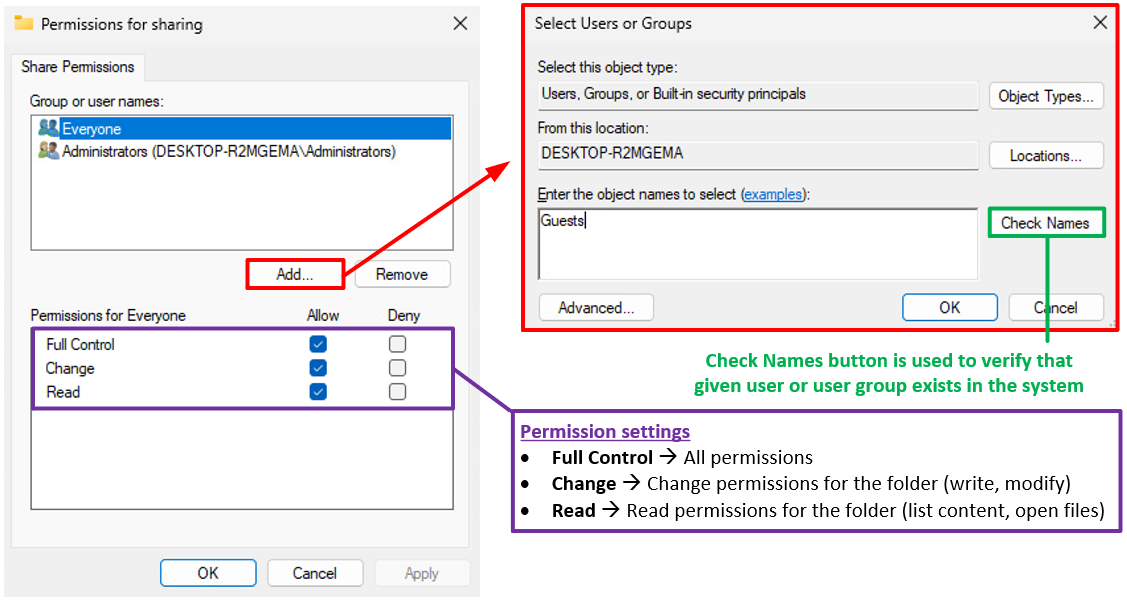
Note: The Deny column should not be used (in the event of a conflict, it exceeds the Allow amount and thus can make permission definitions difficult to sort out)!
Accessing shared folders
- A connection to a network share is established using the UNC name (Universal Naming Convention) of the share
- A UNC name is presented in the following format: \Computer_name\Sharename\Path\
- Below is an example where test user has accessed the network share by typing the UNC name of the shared folder (\DESKTOP-R2MGEMA\sharing) to the address field
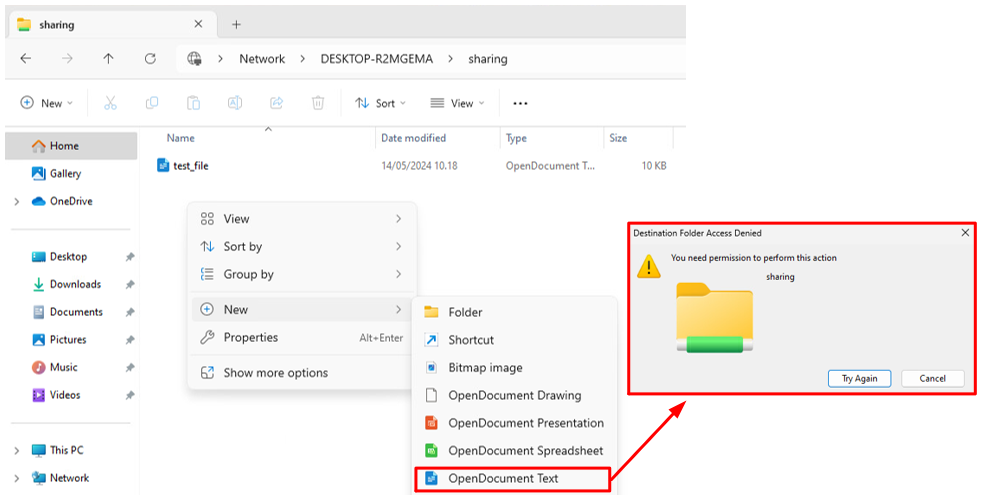
- Folder already has one file (test_file) which has been created by the folder owner (full control to the shared resource)
- Since the folder has Read permission for Everyone (all users and groups in the system), creation of the new document file is denied with Destination Folder Access Denied message
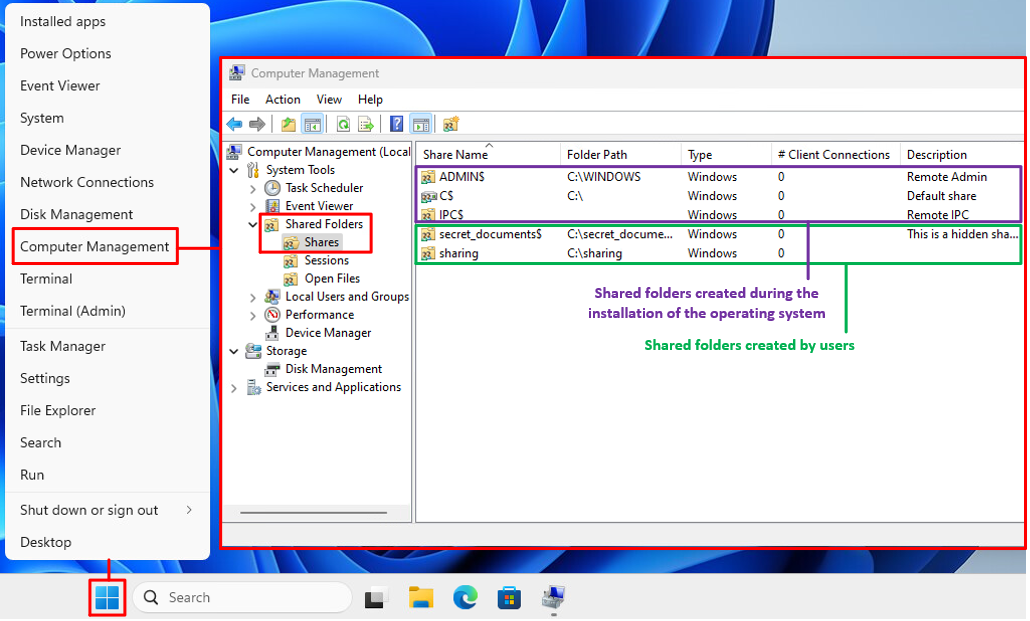
- Shared folders can be viewed using Computer Management tool
- This tool can be opened by right clicking the Windows button in task bar and choosing Computer Management from the opening menu
-
Descriptions of hidden shared system folders:
- ADMIN$
- Hidden administrative share that maps to the system root directory, typically C:\Windows
- It is used for remote administration tasks, such as accessing system files, applying updates, and managing the system remotely
- Only administrators have access to this share
- C$
- Hidden administrative share that provides access to the root of the C: drive
- It allows administrators to manage the entire contents of the C: drive remotely
- This type of share exists for each partition or drive on the system, for example, D$ for the D: drive
- IPC$ (Inter-Process Communication)
- This share is used for inter-process communication between networked computers, specifically for passing information such as authentication data between processes
- It does not provide direct access to the file system, but it is essential for certain types of network activities, like managing remote computers or remote administration
- ADMIN$
-
Shared folders can also be inspected through command prompt using net share command like shown in the example image below
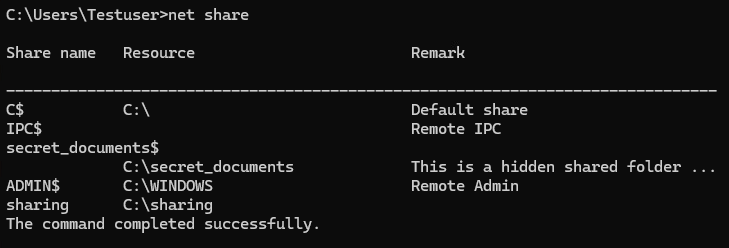
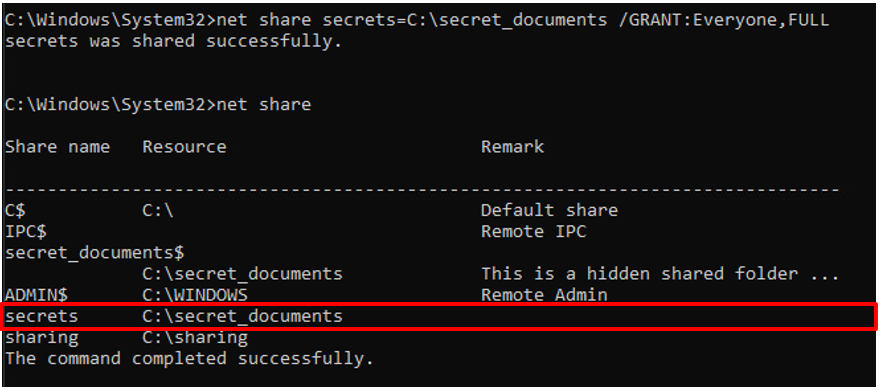
- This command can also be used for giving permissions to users and groups using the following syntax:
net share Sharename=Path /GRANT:UserOrGroup,permissions
- For example, giving the user group Everyone full access to the secrets folder is shown in the image below
Hidden shared folders
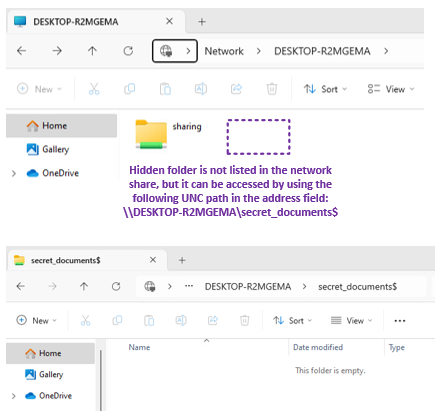
- The shared directory can be hidden by adding a $ sign after the share name
- Below is an example of using a hidden directory
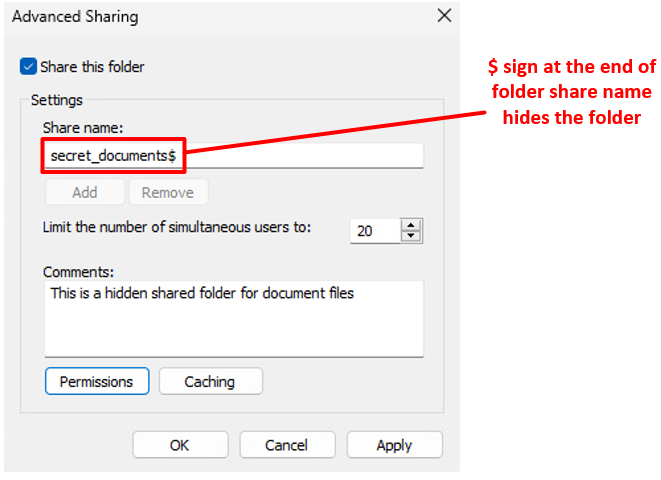
- Hidden folder is not listed when another user is listing shares of the computer
- In order to access the hidden shared folder user must know the share name of the folder and use the dollar sign ($) at the end of the share name (see example image below)