User management
Background
- Each user must have an account in order to use the computer.
- There are three types of user accounts
- Administrator
- Standard user
- Guest
- Accounts can be located either locally on the computer or online (domain environment).
- The computer must have at least one administrator account.
- The administrator account is not recommended for 'normal use' -> account should mainly be used for maintenance purposes.
- For data security reasons, it is recommended to rename the main user account and the guest account and disable the guest account if it is not needed.
- It's also not a good idea to activate more than one administrator account on the machine for no reason.
User account
- Defines user rights to files, folders and applications.
- Defines what changes the user can make to the system.
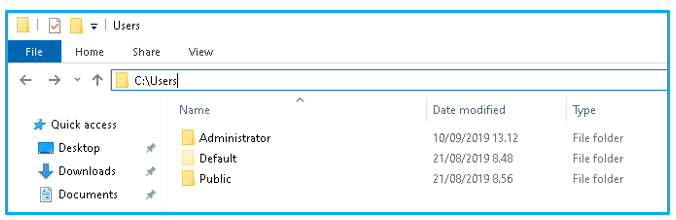
- By default user accounts and thus also user profiles are located in the following path: C:\Users.
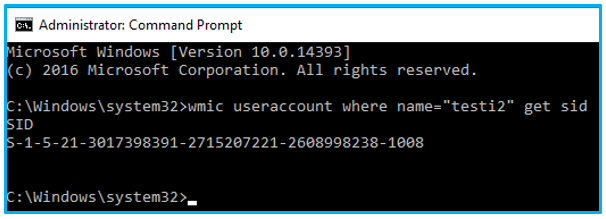
- Each user account has a unique security identifier (SID, Security Identifier)
- Comparable to the UID (User Identifier) used in Linux
- The SID can be retrieved, for example, via the command line with the following command:
wmic useraccount where name=<user_account_name> get sid
- Below is an example of how to retrieve the SID of user testi2.
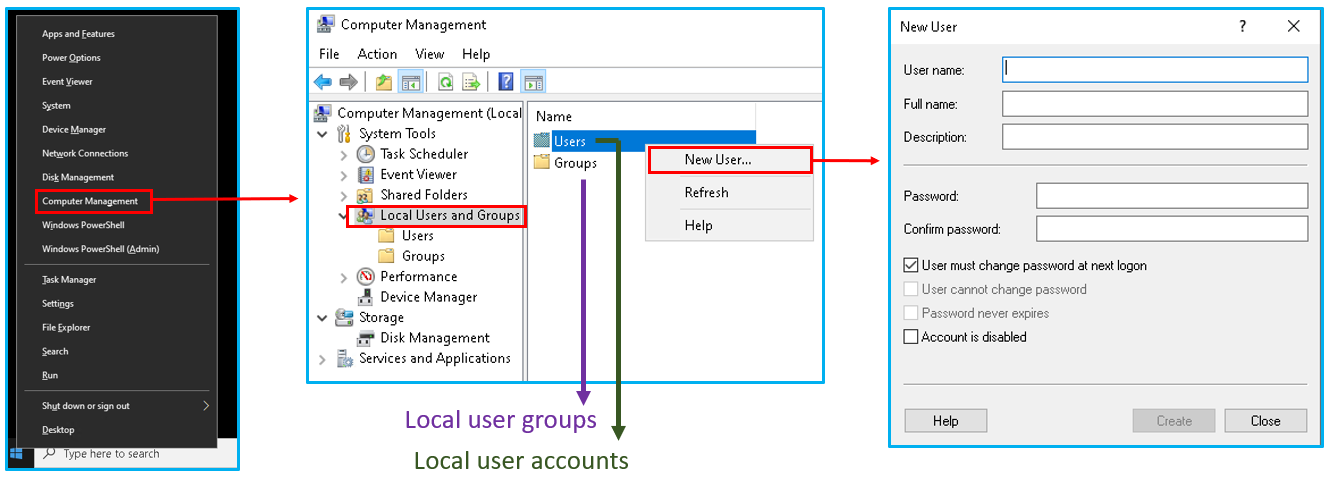
- In Windows, management of users and user groups is done centrally via the Local Users and Groups control panel.
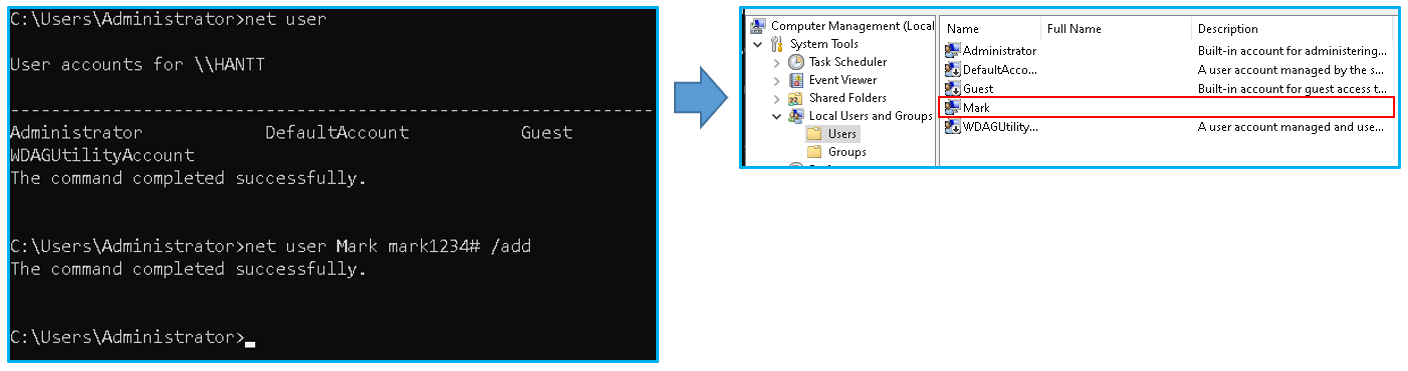
- A new user account can be added like shown in the image below.
- The user account can also be added through the command prompt using the net user command.
- The command syntax for adding a user is as follows:
net user username password /add
- Password is not mandatory with this command and can be set later.
- Below is an example where user Mark is added to the system via command prompt.
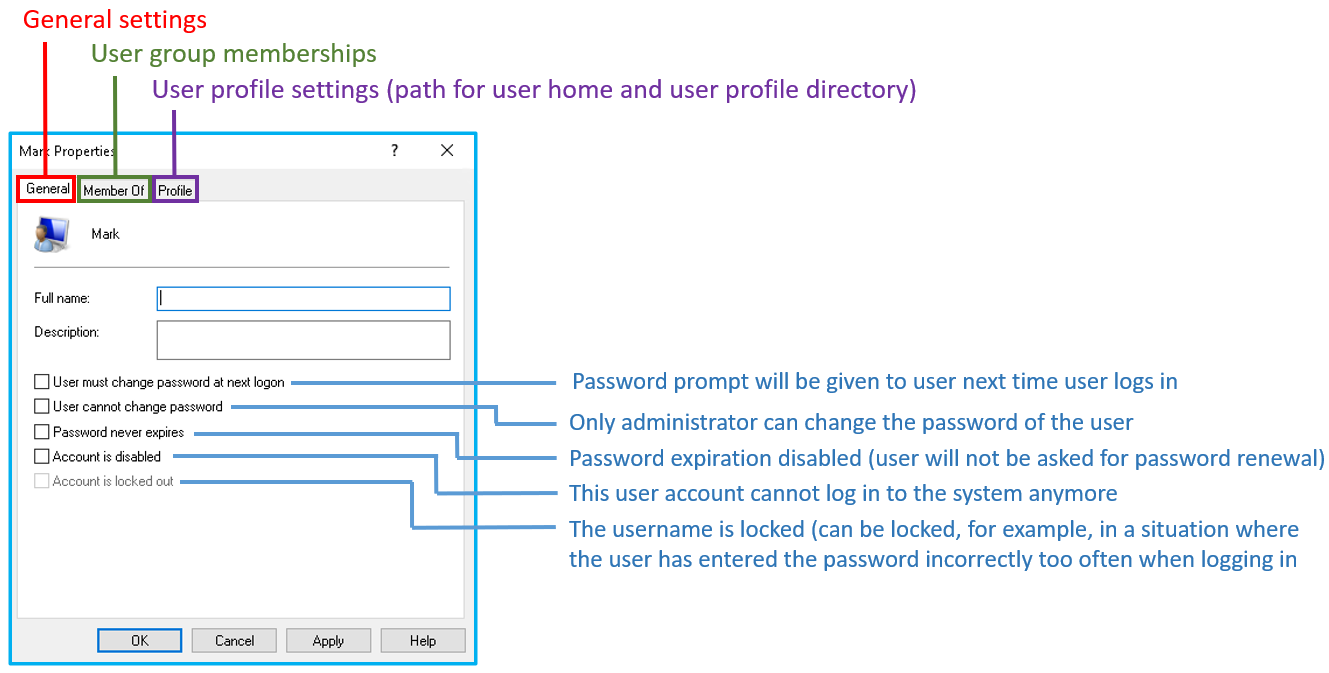
- User account settings can be found from Local users and groups tool by opening the properties of a selected user account.
- Below are the descriptions of the settings.
User profile
- Contains the user's personal settings.
-
Defines a user-specific environment at login
- Folders
- Registry settings
- Desktop and control panel settings
- Menu commands
- Applications
- Personal files
- Other settings
-
There are two different types of user profiles in Windows environments:
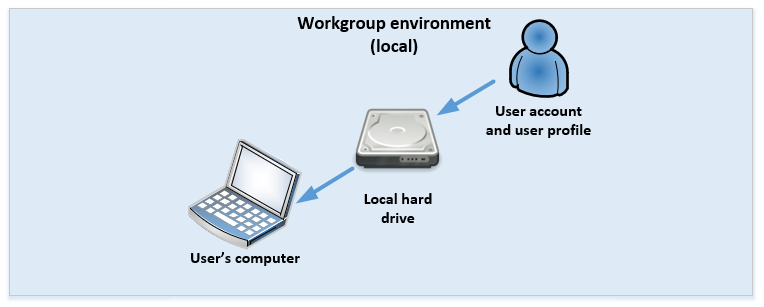
- Local profile (Workgroup environment, WORKGROUP):
- The user's profile information is located on the computer's hard drive.
- Logging in does not require an internet connection.
- Profile located on the server (Domain environment, DOMAIN):
- The user's profile is located on a centralized server (domain controller server with Active Directory) from which it is downloaded at login.
- When logging out, profile changes are saved on the server.
- Local profile (Workgroup environment, WORKGROUP):

User groups
- A user can belong to one or more user groups.
- Groups affect user rights in the system (what users can and cannot do).
- The administrator can create more user groups and transfer the users he wants to them.
- Groups make maintenance easier → several users have the same rights.
- In the local computer, only local, system-specific User Groups are affected.
- Deleting a user group does not delete group members.
- Clears the contents of the group's access list.
- Group SID is removed that cannot be recreated.
- Global groups are used in domain environment.
- Like user accounts, user groups also have a unique SID (Security Identifier).
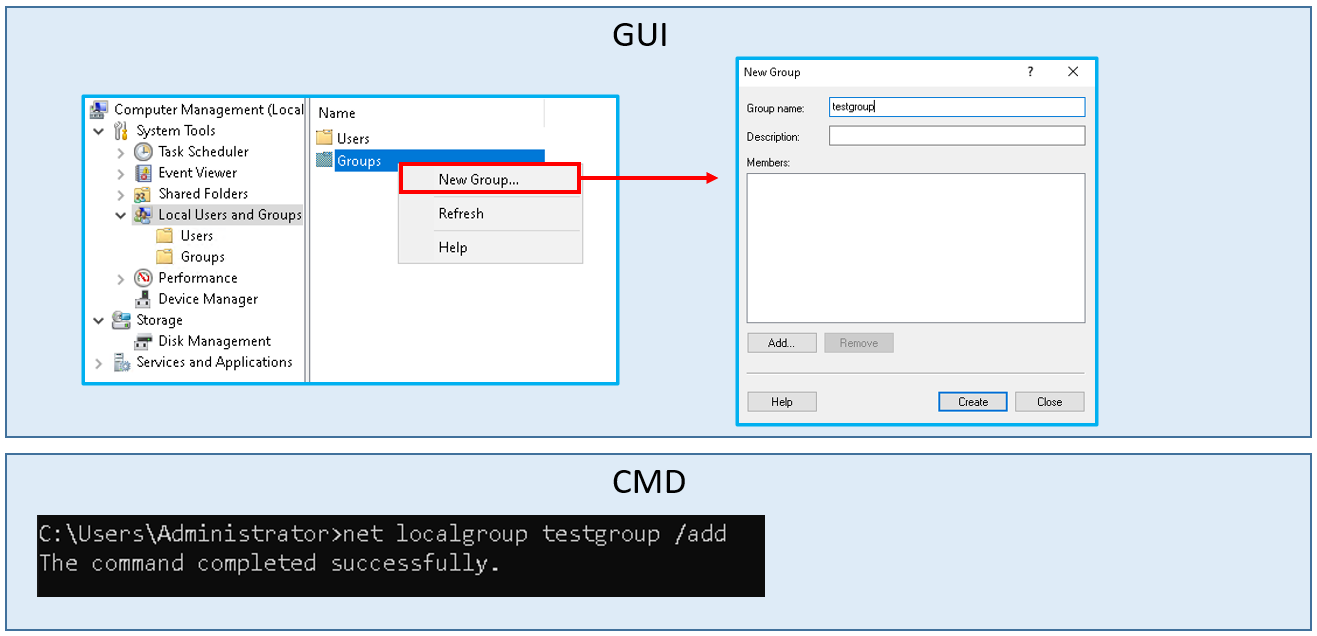
- Below is an example where a local group called testgroup is created to the system either using the Local users and groups tool or command prompt.
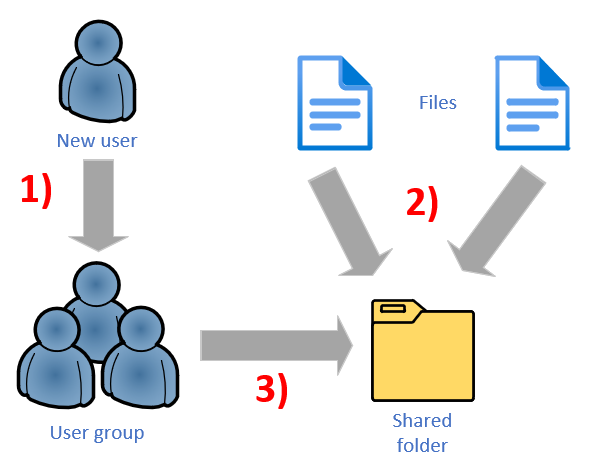
- The effective way to utilise user groups is depicted in the model below.
- A new employee joins the company and the employee needs the rights to systems and shared folders according to his/her own department → for a single user account, defining rights is tedious.
- A commonly used user group model is shown below, where rights to shared resources are given according to user groups.
Example
- Add users to user groups
- Organise files into shared folders
- Add access rights for the user groups to shared folders
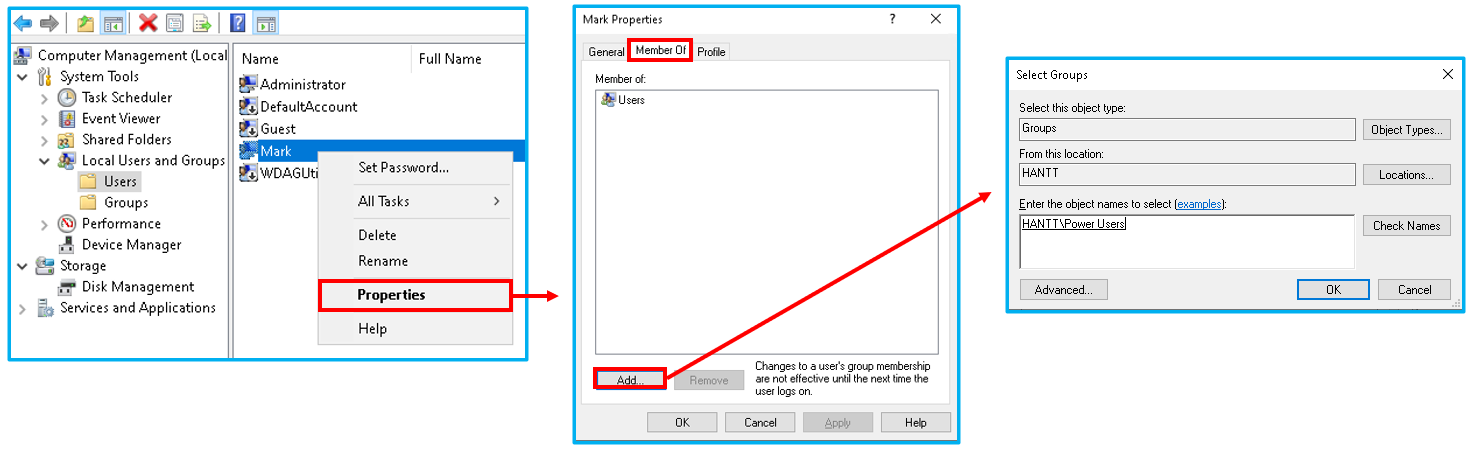
- The user can be added as a member of the group either through user-specific settings or alternatively from the group's properties.
- The example of using user-specific settings is shown in the image below.
- In this example user Mark is added to the Power Users group.
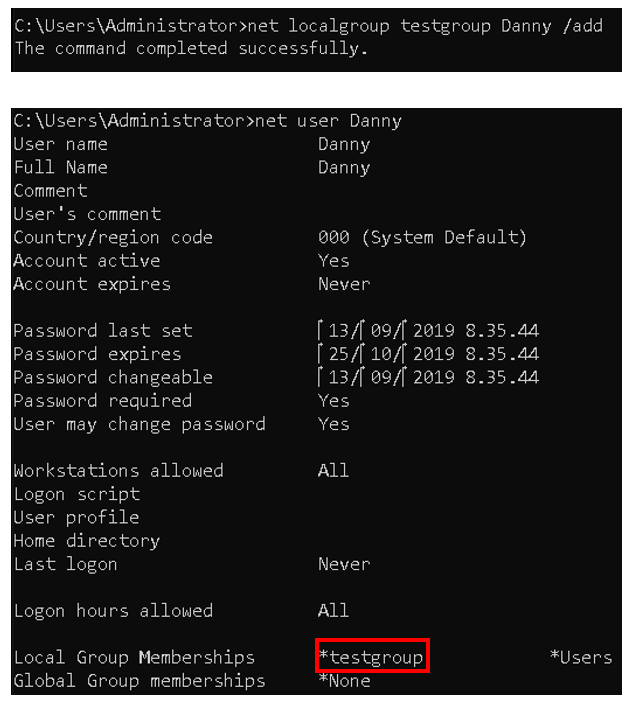
- User can also be added to the user group using the command prompt.
- To add a user from the command prompt, use the command net localgroup and the additional parameter /add.
- Correspondingly, the user can be deleted using the /delete attribute.
- The command syntax is as follows:
net localgroup group_name user_name /add
- Below is an example where the user Danny is added to user group called testgroup.
Running programs with administrative rights
- In Windows, it is possible to run programs as a normal user with root user rights (same as sudo command in the Ubuntu Linux distribution package for example).
- For each program that can be run, there is a Run as Administrator option behind the menu that opens with the right mouse button.
- In the command prompt, the program is started as the administrator user with the runas command, the syntax of which is as follows:
runas /user:username file_path_and_name

Built-in user groups
- There are numerous premade user groups in Windows.
- For example, a user belonging to the guest user group (Guests) can use the computer with limited rights.

Service accounts
- Each service must have a user account that runs the service in the system.
- Service accounts are user accounts that guarantee the secure running of services in the system.
- A service account determines the service's access to local and online resources.
- Windows has a system process called Service Control Manager (SCM) that sets up a service to run under one of the following built-in service accounts:
- LocalService → The smallest rights to the local system, appears anonymously on the network.
- NetworkService → The smallest rights to the local system, used for services that need a network.
- LocalSystem → Extended rights to the local system, can also be used for services that require a network.
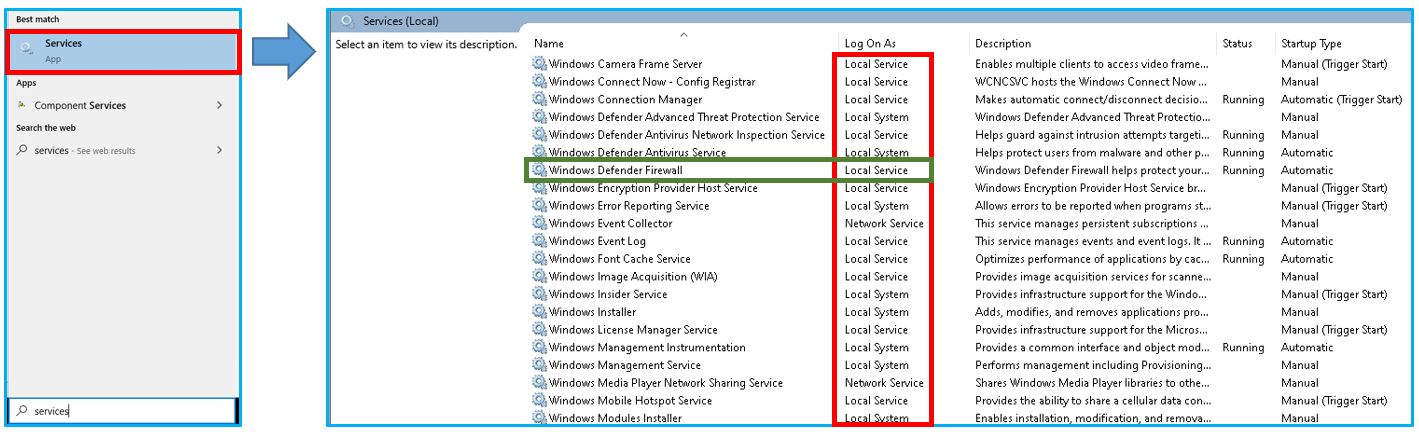
- Below is an example of the Windows services view (services.msc).
- The view lists all Windows services and the Log On As column shows the service account used to run the service.
- As can be seen from the example image below, Windows Defender Firewall service is run under the LocalService service account (lowest rights to the local system).